Worksheet Scripts and Column Scripts |
Previous section: Worksheet Notes
This topic contains the following sections:
Scripts can be used to transform data or to calculate new data. Beside this, they are very useful for all kind of automation purposes. The scripting language that is supported so far in Altaxo is C# (CSharp). If you are new to C#, you should read a tutorial about C#. However, for simple calculations, you should be just fine going to the script examples.
For a given table, you can have one worksheet script, which is intended for calculations concerning all (or most) of the table’s data.
For calculations that affect only one column, you can use a column script. For every column in a table, you can have a separate column script.
These are only some hints when to use a worksheet script and when to use a column script. Beside this, there is not much difference between the two. Both have access to all data in the table (read/write).
Personally, I find it often easier to maintain a worksheet script instead of multiple column scripts, because you have to look only in one place. Additionally, worksheet scripts can be called easily from other worksheet scripts. Thus, for tasks that have to be repeated for multiple worksheets, you can create a worksheet script in an empty worksheet, and then call this script from the worksheet scripts of the other tables. If you need to change the worksheet script, you then need to change it only in one place, namely in the worksheet script of the empty table.
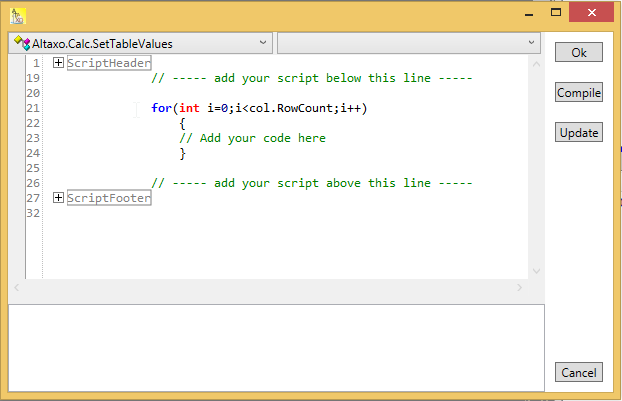
As an example we will have a look at the dialog box for a worksheet script. To create a worksheet script for the currently active worksheet, select Worksheet→Worksheet script from the main menu. A dialog opens (see figure below):

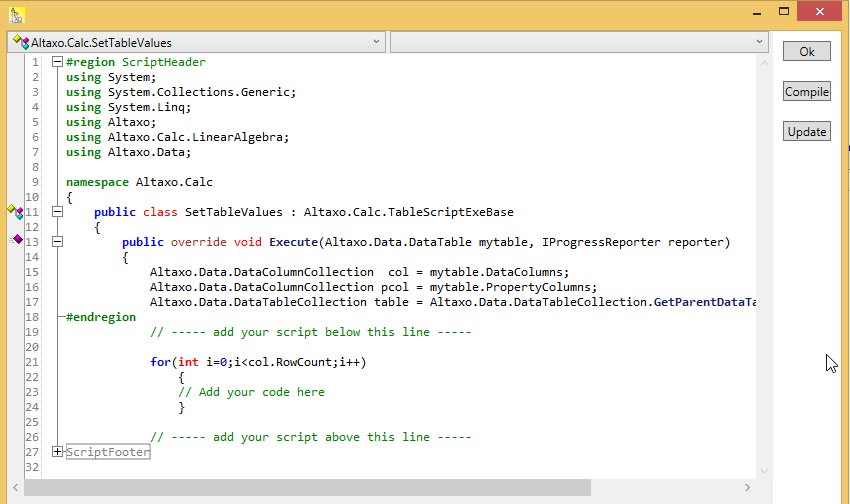
As you can see, there is already some text typed into the script window. Usually, you change the script text between the two comment lines (green). But sometimes it is also necessary to change the code above the first comment line. In the figure above, this text is collapsed. To show the text, click on the ‘+’ button in the first line. After this, the text looks like this:
Please change this text only when you already have some experience with C#. To collapse the script header again, click on the ‘-’ button in the first line.
Assume you have written something (I’ll come to some examples later), you will have four choices:
Pressing the ‘OK’ button gets the script compiled and then executed. The dialog box will be closed before execution of the script. If your script runs longer than approx. 10 sec, another dialog box will pop open, in which you should be able to cancel the execution of the script.
Pressing the ‘Compile’ button will compile the script (the script is not executed). The dialog box remains open. This is useful if you just want to see if your script can be compiled. A success message is then shown in the lower part of the dialog. If compilation was not successful, you can click on the error message(s) in the message window, which brings the cursor to the position where the error was detected.
Pressing the ‘Update’ button closes the dialog box without compiling and execution the script, but the script is updated (saved as part of the worksheet). You can use this button if your script currently doesn’t compile, but you want to save the changed you made so far.
Pressing the ‘Cancel’ button closes the dialog without compiling and execution. The changes will not be saved, thus all changes you have made so far will be lost.
The worksheet scripts of the current worksheet is opened by choosing Worksheet→Worksheet script from the main menu. A dialog box described before opens.
When you expand the ScriptHeader of the worksheet script, you will see the following code:
Users with some skills in C# know that lines 2-7 are using statements, bringing some namespaces into easy access. You can add additional namespaces here. Unskilled users should leave those lines alone.
Interesting lines are line 13, 15, 16, and 17. They show, which local variables you can use for accessing your table:
‘mytable’ (line 13) : the data table for which this script is executed. Usually, this is the worksheet with which this script is associated; but if you call this script from other worksheet scripts, it is usually the table of the calling worksheet script.
‘reporter’ (line13): a variable used for long-running scripts to report the progress of the script execution. If your script runs shortly (less than some seconds), you can safely ignore this variable. You can even ignore it for long-running scripts, but then you will have no clue about the progress your script is making.
‘col’ (line 15): is the collection of data columns of the table ‘mytable’
‘pcol’ (line 16): is the collection of property columns of the table ‘mytable’
‘table’ (line 17): is the collection of all tables in the current project
As you can see from the above list, you not only have access to your ‘own’ table, but to all tables in the project (via variable ‘table’)! In fact, by the static variable ‘Current’ (which is permanent in all scripts, but is not shown in the figure above), you have access to all data of your current project plus all classes of Altaxo itself. Thus you are able to write very powerful scripts, or on the other hand, you can mess everything up. It’s up to you!
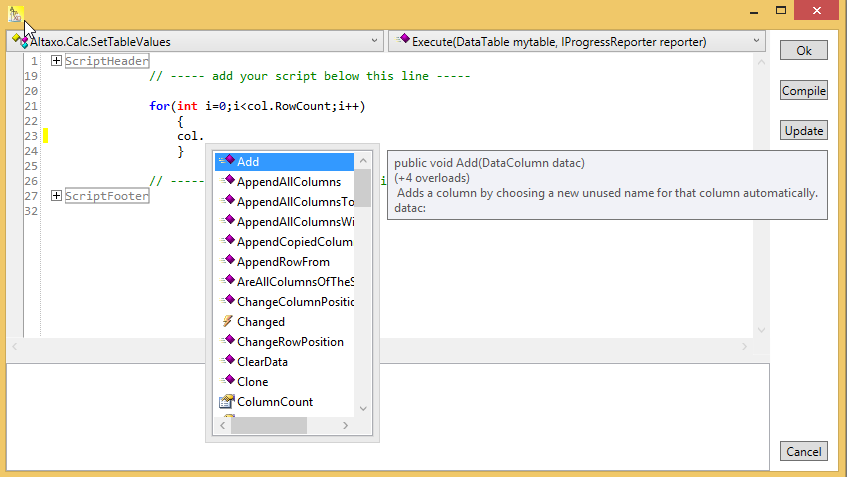
I’ve almost forgotten one very very useful feature: the code completion support! When you begin to type, you will see a dialog box with suggestions, applicable for the current context. In the figure below, I typed in ‘col.’. This popup appears after I typed in the dot:
Here, you can see all the methods and properties of the ‘col’ variable (remember that ‘col’ was the collection of data columns of the table ‘mytable’). Here, I selected the add method, and in the explanation balloon to the right of the popup it is said that the Add methods has 4 overloads (i.e. there are in fact four different Add methods, each one with a different parameter set), and that the first overload simply takes a DataColumn as argument. Is also explains what the Add method is doing. If you want to use the ‘Add’ method, simply press the Tab key, and Add will be included in your script. In this way, you can write scripts even with long method names in short time. If you don’t want to use the ‘Add’ method, just press the first char of your method name of choice, and the dialog box will show only those methods, whose name starts with the character you typed in.
But let’s see some examples. If not stated otherwise, all examples refer to the script text between the lines
// ----- add your script below this line -----and
// ----- add your script above this line -----Example 1: Fill a column with calculated values
In this example we want to have a data column, in which each value is the square of the row number.
    for(int i=0;i<10;i++)
        {
        col["A"][i] = i*i;
        }
In the first line a new integer variable ‘i’ is created, which starts at 0 and must be less than 10 (thus the last value is 9). In every loop, it is incremented by one (‘i++’).
The third line is more interesting. By using col["A"], you access a data column with the name “A” that is hopefully contained in your table (don’t care, if it isn’t, you will get an error at the time of execution of the script).
By stating col["A"][i], you are accessing the row with the index i in the column with name "A". Please remember that indexing in C# always starts with 0. Thus the cell in the first row of column "A" is accessed with
col["A"][0]
By stating
col["A"][i] = i*i;you set the ith row of column "A" with a value, which is i times i.
That’s it! But why not use
for(int i=0;i<col.RowCount;i++)
which is the default statement when you create a new worksheet script? That’s because col.RowCount specifies the number of rows of the whole worksheet (one more than the index of the last data row that contains any value). And because our worksheet was empty at the beginning, col.RowCount initially is 0 (zero)! This would mean your loop is not executed at all, and no values are filled in your data column!
In addition to specify a column by its name, you can also specify it by its position in the worksheet. For instance, if column ‘A’ is the first column of your worksheet, the following statements are equivalent:
col["A"]
col[0]
Again, the first column of the worksheet is specified by index 0 (not 1).
Example 2: Calculate column values from other columns
Suppose you have already two columns, for instance col["A"] and col["B"]. You want to have a new column with is the difference of the square root of the first column and the 3rd power of the second columns (or whatever fancy mathematical functions you want to use).
At first you have to create your new column by choosing Worksheet→Add new data column from the main menu.
There are two possibilities to do the calculation using a worksheet script:
Calculate the values for every row in the worksheet using a loop (as in the previous example)
Use column mathematics
For the example, the values in our new column should be the square root of the values in the first column minus the 3rd power of the values in the second column:
Solution 1 (using a for loop)
    for(int i=0;i<col.RowCount;i++)
        {
        col["C"][i] = Sqrt(col["A"][i]) – Pow3(col["B"][i]);
        }
Solution 2 (using functions on whole columns):
col["C"] = Sqrt(col["A"]) – Pow3(col["B"]);
Here, the Sqrt() and Pow3() functions are defined in the script environment, taking whole columns as arguments. Each of this functions executes the function for each element in the column.
The above code line is equivalent to:
col["C"] = Map(Sqrt, col["A"]) - Map(Pow3, col["B"]);
The function Map() takes a function as the first argument (in our case Sqrt), and applies this function to all elements in the column given as the second argument. The Map() function is useful if you need to apply a function which is not defined in the script environment to each element of a column.
Of course, in our case Sqrt is defined in the environment to take a whole column as argument. On the other hand, as an example, the Erf() function is not defined in the script environment. It is defined in Altaxo.Calc.ErrorFunction. If you want to calculate each element in column C as Erf() of each element of column A, you can use
col["C"] = Map(ErrorFunction.Erf, col["A"]);
The map function is defined for multiple elements, too. Thus the example above with square root and 3rd power can be written as:
col["C"] = Map((x,y)=>Sqrt(x) - Pow3(y), col["A"], col["B"]);
Next section: 2D-Graphs

