Importing data |
Previous section: Copy/paste of worksheet data
This topic contains the following sections:
- Importing ASCII data
- Importing Bruker Opus files
- Importing Excel .xlsx files
- Importing Galactic SPC files
- Import JcampDX files
- Importing NeXus files
- Importing Nicolet spectral files
- Importing Origin files
- Importing Princeton Instruments spectral files
- Importing CHADA files
- Importing Renishaw spectral files
- Importing WiTec project files
- Importing images as data
- Importing using a self-written import script
Basically, there are three different ways to import data, which differ by the number of options you can choose.
Import via the file menu (menu File→Import)
Import via the import button in the toolbar
Import via the File explorer
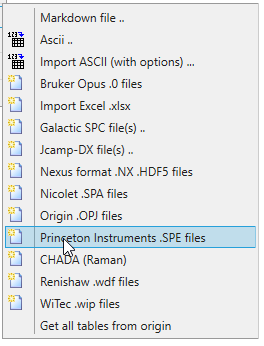
Fig.1: Import via the file menu. This also gives you an idea which file formats are supported by Altaxo.
The import via the file menu (menu File→Import) offers the highest number of import options. First of all, you select the file format you want to import by choosing one of the menu points. Then you can not only import multiple files at once. For file formats which can contain more than one table (e.g., Origin, Nexus, SPC, etc.) you can also choose whether those tables should be imported in individual tables in Altaxo, or into only one merged table. Furthermore, there are options for the naming of the data columns.

Fig.2: Import via the import button in Altaxo's toolbar.
The import via the import button in the toolbar is intended to import only one file at once, thus it offers slightly less options compared to the import via the File menu described above. In contrast to import via File menu, the data format is detected automatically, and the importer which is most suitable is used for import the data. Thus, in case the automatic detection of the data format fails, and you know which data format is used, then you better import your data via the File menu.
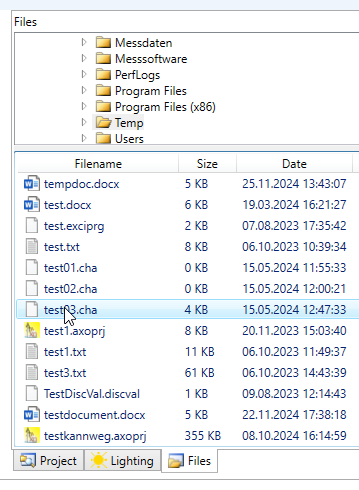
Fig.3: Import via the file explorer. In order to import the file, double-click on it.
The import via the File explorer offers the least possibilities. You can only import one file at once. The file format is detected automatically. In case the file contains more than one table, all tables are imported into only one Altaxo table. To import a file, open the file explorer (menu View→Files), then navigate to the file you want to import and double-click on it.
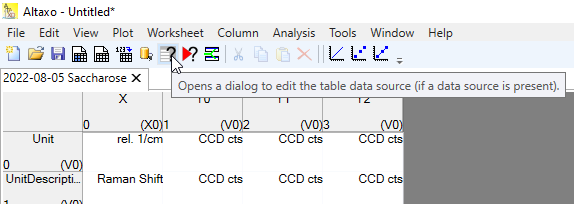
Fig.4: By clicking on the question mark in the toolbar
After your import was successful, you will see one or more tables (depending on the file format and your options) in the project explorer which contain the imported data. Each table remembers the origin of the data in an object named TableDataSource. By clicking on the question mark in the toolbar
In the following chapters the individual file formats are described in more detail.
Importing ASCII data from a single file into a single worksheet
To import ASCII data from a single file into a (single) worksheet, first make the worksheet to import to the active document, or create a new (preferably empty) worksheet.
Then choose File→Import→Ascii from the main menu, or use the import toolbar button.
A file dialog opens. After selecting the Ascii file and pressing OK the Ascii data are imported into your active worksheet. The import process is a two-step process:
The Ascii file is analyzed first. The first 30 lines of the Ascii files are read, and the lines are analyzed for their structure. The structure that is most frequently repeated in the other lines wins the game and determines the number of columns and their type. The recognized columns are created in the worksheet.
The data are then imported in the thus prepared worksheet.
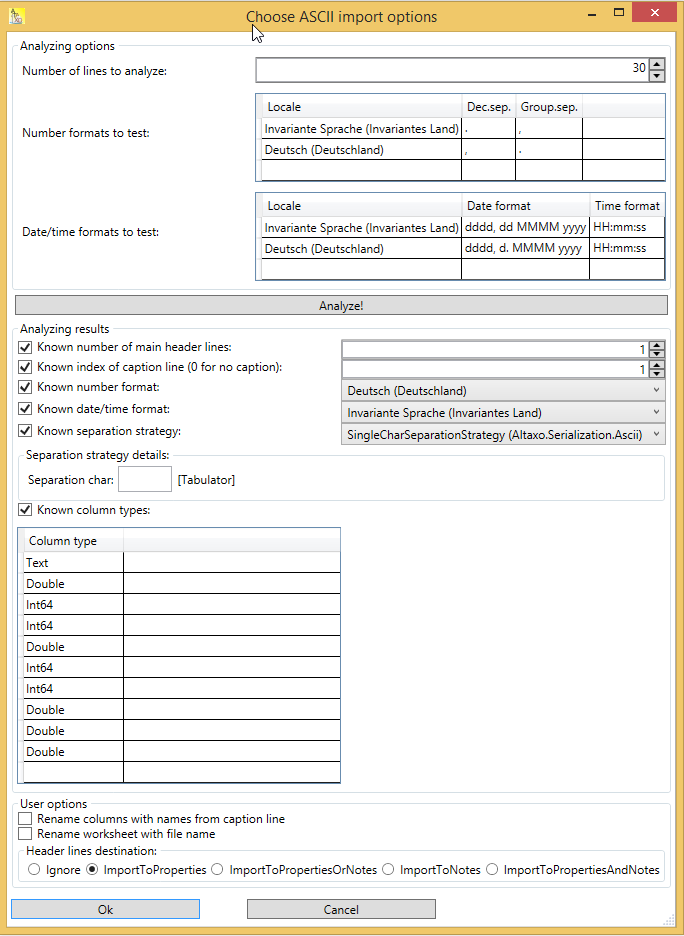
If the result of the import is not satisfactory, you can control the import options by choosing File→Import→Ascii with options from the main menu instead. Here too, at first a dialog opens in which you can choose the file to import. The Ascii file is then analyzed, and the result of the analysis is shown in another dialog.
The dialog is divided into three parts: in the upper part, the analysis options are shown. In the middle part, the result of the analysis is shown. The lower part contains some user options.
When you press the button “Analyze!”, the options in the upper part of the dialog are used to analyze the Ascii file. Already known information is used from the middle part. In the figure above, there is nothing left to analyze, because on all results the checkbox is checked, meaning that this result is already known.
Suppose that Altaxo’s automatic analysis has incorrectly recognized the number of main header lines, and as a consequence, has also incorrectly determined the number and the type of columns. You can then correct the number of main header lines manually (if known to you). Leave the checkbox “Known number of main header lines” checked in order to indicate that the number of main header lines is already known. But uncheck the checkbox “Known column types”. If you now press the button “Analyze”, Altaxo runs the analysis again, but takes into account the correct number of main header lines. Hopefully, this will now lead to the correct recognition of the number and types of columns.
Likewise, you can correct any analysis result that you know better of, and uncheck those results that you want to be analyzed again.
Finally, press OK to import the Ascii file into your worksheet.
Importing ASCII data from multiple files into a single worksheet
Suppose you have a spectrometer that stores every spectrum in a single Ascii file. The data in each file is structured into two columns. The first column usually contains the values of the wavelength, and the second column the measured values (for instance absorbance). Furthermore, suppose that you acquire a series of spectra, e.g. the time dependence of some reaction, so that you have hundreds or even thousands of spectra.
You probably not want to import each spectrum into a single worksheet, because then you will get hundreds or thousands of worksheets. Instead, it would be convenient if all spectra would be imported into a single worksheet. And, because all spectra share the same wavelength values, you will need only one wavelength column in your worksheet (instead of one wavelength column per spectrum).
To import all spectra into a single worksheet, create a new (preferably empty) worksheet or open an existing one, and then choose File→Impor→Ascii (all into a single worksheet). A file dialog opens, in which you have to select all files you want to import. After pressing OK, the selected files will be sorted by their file name and in this order imported into the current worksheet.
Note: Should it happen, that the x-column of one or more imported data files is different from the first imported file: this is not a problem. The new x-values will be imported into a different column, which gets a new group number, and all other imported columns of that file will get the same new group number.
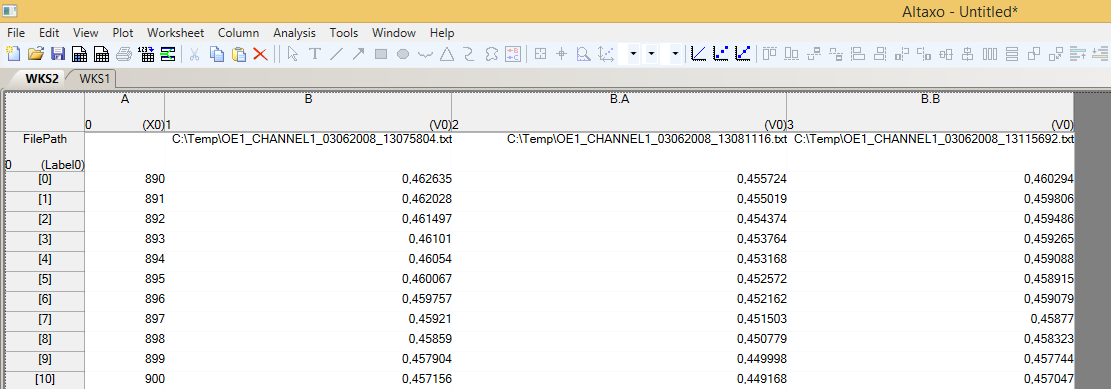
Note: A property column named “FilePath” is created in the current worksheet. The cells of this property column are filled with the file name of the file where the data originate from.
In the figure below you can see the result after importing three spectrum files.
As you can see, the first column contains the wavelength values. Because there is only this one x-column, we conclude that the three spectra share the same wavelength values. The next 3 columns contain the spectral amplitudes of each spectrum. The property column “FilePath” contains the file names of the spectrum files. As you can see, the spectrometer codes the date and time into the filename. With the help of a script, one can extract this date/time and use it to calculate the time span relative to the start of measurement.
Importing ASCII data from multiple files into separate worksheets
If you want to import Ascii data from multiple files into separate worksheets, the most preferable way is to start when your current document is either a graph, or there is no current document at all.
Background: if your current document is a worksheet, the first Ascii file is imported into this worksheet, and the other files are imported into newly created worksheets. The newly created worksheets get the name of the corresponding Ascii file, but the first worksheet is not renamed.
Thus, either select a graph, or close all documents (main menu: Window→Close all documents) before importing into separate worksheets.
Choose File→Import→Ascii (or File→Import→Ascii with Options), and select multiple Ascii files in the file dialog.
If you press OK, the selected files will be sorted by their file name, and then imported into newly created worksheets. The new worksheets are located in the root folder of the project.
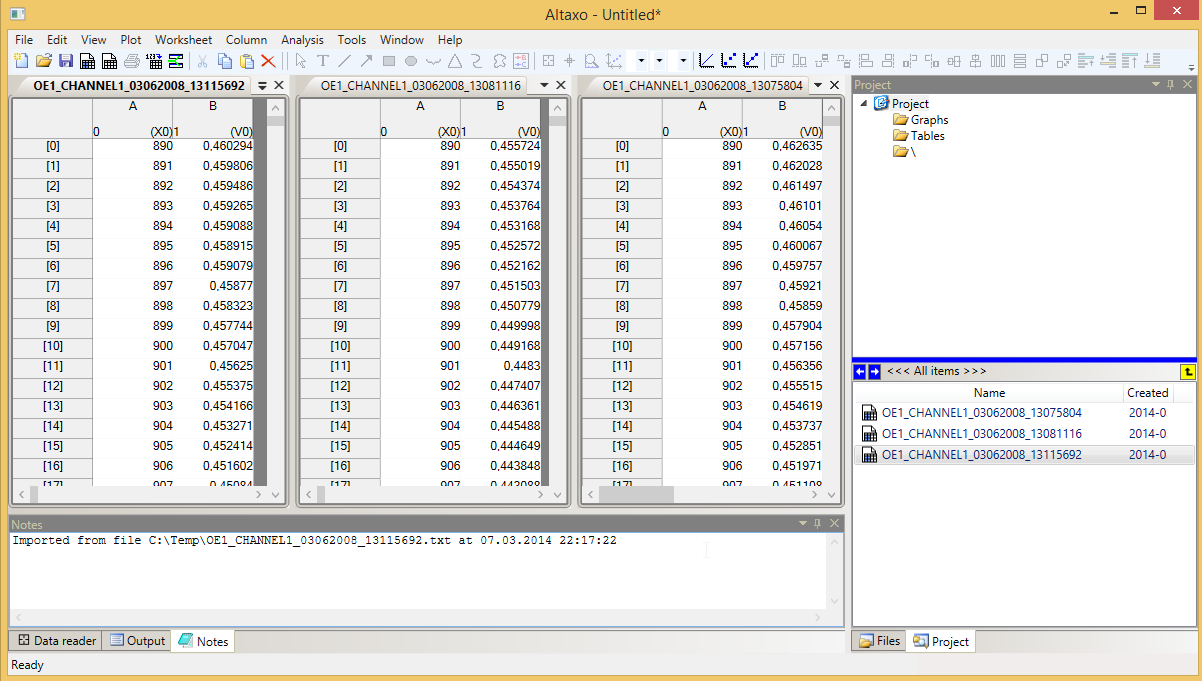
The figure below shows the result after importing the three spectrum files from the example of the previous chapter into separate worksheets.
Please note that the new worksheets get the names of their corresponding Ascii files (see Project explorer at the right side). Furthermore, the “Notes” tool window of each worksheet (at the bottom) contains a note with information about the original file name and the date/time of the import. In contrast to the example in chapter “Importing ASCII data from multiple files into a single worksheet”, each worksheet now contains a separate x-column with the wavelength values.
Importing multiple ASCII files into a single worksheet vertically
This command is useful if you have a time series of data in one file, which is continued in another file and so on. You can then import all data into a single worksheet. The data from the second file is appended to the data from the first file. This means that the data from the second file is imported starting from the next free data row of the worksheet.
Create a new (preferably empty) worksheet or choose an existing one. Then use File→Import→Import ASCII vertically from the menu. Select multiple Ascii files in the file dialog. After pressing OK, the files are sorted by their file name and imported into the current worksheet.
I have to admit that this function makes no sense for my example (see previous chapters) with the three spectra, but the next figure shows the outcome after I imported the three spectra with this command.
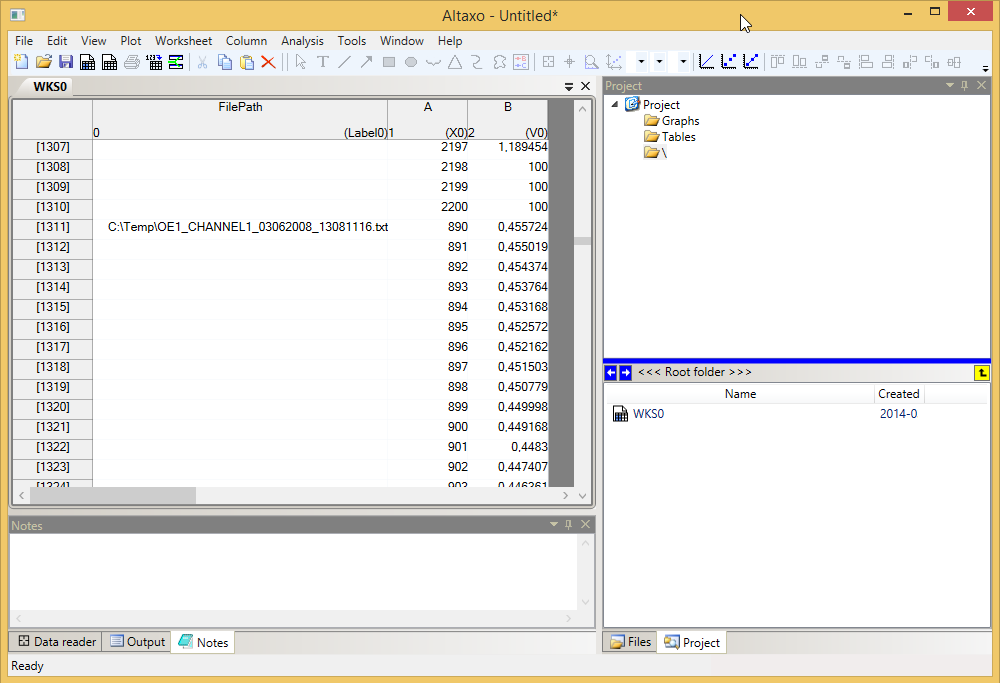
As you can see, data row [1310] is the end of the first spectrum. The first row of the next spectrum is imported into data row [1311]. Note that the file name of the imported file is stored in column ‘FilePath’ at the beginning of each data chunk.
Bruker Opus files usually have the extension .0. This is a binary file format which is used for spectra measured with Bruker spectrometers. The file contains one spectrum.
Altaxo supports the import of Excel .xlsx files. The older format .xls is not supported. Since Excel columns can contain different types (text, numbers etc.), but columns in Altaxo can only hold a specific type, the importer determines automatically which type is most suitable. This means, that if an Excel column not only contains numbers, but also text, the resulting column type in Altaxo is a text column.
Galactic SPC files usually contain spectral data. They usually have the extension .spc. Galactic SPC is a binary file format consisting of a main header describing the contents, followed by the binary data section. One .spc file can contain multiple spectra.
References:
[1] SPC file format
[2] Galactic Universal Data Format Specification 9/4/97
JCAMP-DX format was developed by the Joint Committee on Atomic and Molecular Physical data, originally for Near Infrared (NIR) spectra, but the format can be used for other spectra as well. It is an Ascii based format with special formatting. The files usually have the extension .dx or .jdx. Typically one file contains one spectrum, but multiple spectra per file are supported as well, simply by appending the other spectra.
Reference:
[1] R. S. McDonald, and P. A. Wilks, Jr., "JCAMP-DX: A Standard Form for Exchange of Infrared Spectra in Computer Readable Form", Applied Spectroscopy, Vol. 42, No.1, (1988), pp. 151-162, https://doi.org/10.1366/0003702884428734
The NeXus file format is a file format driven by the NeXus community with a growing field of applications. Its base format is .HDF5. Nexus files usually have the extension .nx or .nxs.
Since typically a NeXus file can contain multiple tables, it is recommended to import these files be the File→Import menu, so that you can change the options how those multiple tables are handled.
References:
Altaxo supports the import of Nicolet spectral files with the extension .SPA. This is a binary file format, supporting one spectrum per file.
References:
Altaxo supports the import of all data tables (spreadsheets and matrices) from Origin project files. Only the old format with the extension .OPJ is supported. Files with the new format .OPJU can not be read. If you by chance know about how the new .OPJU format is structured, let me know by opening a Github issue.
References:
Altaxo supports the import of spectral files from Princeton Instruments devices. The file extension usually used for those files is .SPE. Those files are binary files with an Xml section containing the document metadata at the end of the file. The format is rather complex and supports beside spectra (multiple spectra per file) also image data.
References:
The CHADA file format is based on .HDF5. It consists of one or multiple HDF5 data sets, located in the root folder of the .HDF5 file. All data sets that are located in the root directory of the .HDF5 file are imported into Altaxo. The file extension of the Chada files is .cha.
References:
[1] HDF5 file format
Altaxo is able to import spectral files from Renishaw instruments. Only files with the extension .wdf are supported. The format is a block based format, containing one or more spectra with a common x-axis.
References:
[1] Henderson, Alex DOI:10.5281/zenodo.495477
Altaxo supports the import of WiTec project files. WiTec project files are very complex and can contain multidimensional spectra and images. Only the spectra import is supported for now. WiTec project files usually have the extension `.wip'. The format is very complex, and can contain multiple spectra and images.
[1] J. T. Holmi, H. Lipsanen, "WITio: A MATLAB data evaluation toolbox to script broader insights into big data from WITec microscopes", SoftwareX 18 (2022), 101009, doi: https://doi.org/10.1016/j.softx.2022.101009
Data from images can also be imported into Altaxo. For color images, you can choose which color channel to import, or only importing the luminance values.
By choosing File→Import→Using file import script you can write your own script to import files. The advantage compared to a worksheet script is that the TableDataSource still remembers where the data come from, and that the script will not change if the file name(s) change.
At first, create a new, empty worksheet to import the data into, or select an existing one. Then, use the menu item File→Import→Using file import script to open the import script dialog.
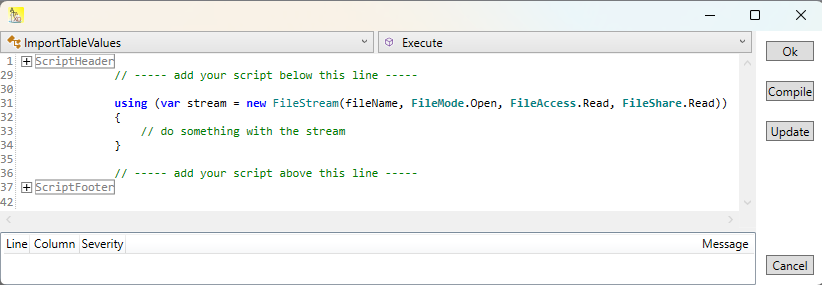
Fig.1: Import script dialog after you open it (without expanding the script header)
By clicking on the '+' sign in line 1 of the script, you can expand the script header to see which variables are available in your script.
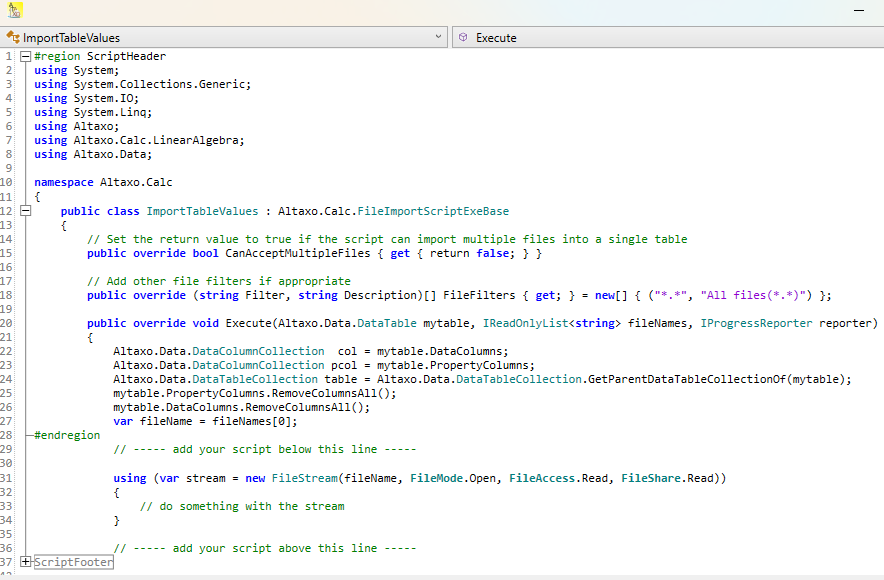
Fig.2: By clicking on the '+' sign in line 1 of Fig.1, you can expand the script header to see the lines that define some helper functions and the Execute function.
Fig.2 requires some explanation:
In line 15, the function CanAcceptMultipleFiles define whether your script can process multiple files. The default return value, as you can see, is false. Set it to true if your script can process multiple files.
In line 18, you can define your default extension. For instance, if the extension of your file is .abc, then replace "*.*", "All files(*.*)" by "*.abc", "My ABC files (*.abc)".
Line 20 defines the Execute function that is used to import your files. The arguments of this function are:
mytable: The table to import the data in.
fileNames: A list of file names (absolute file names including the full path) of the files you want to import. If CanAcceptMultipleFiles is set to false (in line 15)), then the list contains only one file name.
reporter: Can be used to report the progress of the import, and to cancel the operation if the user presses the Cancel button.
Line 25 and 26: Before importing the data, the old contents of the data table is removed.
Line 27: Convenience function when importing only one file: The file name of the first file in the list of file names is put into variable fileName.
Line 31-34: This is some default basis to build your own script on: A file stream is opened with the provided file name. After the comment in Line 33 you should do something with the stream. Typically, you will read data from the stream and then put the data into the table mytable.
Next section: Changing the structure of a worksheet
